Tuesday, 30 November 2010

Lighting the Scenes

Festival Leisure Park
In this scene I have used:

  1. 'Photometric' light to simulate skylight with an intensity setting of 1590.03. This is positioned:
    X - 35.29
    Y - -118.127
    Z - 126.821

  2. 'Photometric' light to illuminate the interior of the nando's building with an intensity setting of 1500. This is positioned:
    X - -22.126
    Y - 88.418
    Z - 17.573

  3. 'Photometric' light to illuminate the interior of the frankie & benny's building with an intensity setting of 50. This is positioned:
    X - 81.457
    Y - 38.882
    Z - 4.798

  4. 'Omni Light' used to illuminate the interior of the bowling alley with an intensity multipler of 0.5. This is positioned:
    X - 39.606
    Y - 151.674
    Z - 26.215

  5. 'Omni Light' used to illuminate the interior of the bowling alley with an intensity multipler of 0.5. This is positioned:
    X - 61.865
    Y - 149.885
    Z - 26.314

Paintball Scene 1
In this Scene I have used:

  1. 'Omni Light' used to illuminate the entire scene with an intensity multipler of 1.0. This is positioned:
    X - 7.689
    Y - -385.88
    Z - 613.763

Paintball Scene 2
In this Scene I have used:

  1. 'Omni Light' used to illuminate the entire scene with an intensity multipler of 1.0. This is positioned:
    X - 7.689
    Y - -385.88
    Z - 613.763

Monday, 29 November 2010

Animating paintball part3.

The next part of my paintball scene features target shooting. Here I have designed a new environment where my character is positioned taking a firing stance behind some crates, during the animation he aims and shoots at two target boards which are basically planes with a material added to them.


The camera will be positioned behind the character moving in a horizontal direction to the right, this allows us to see whats going on in the scene and clearly see the motion of the character taking aim, shooting and moving to the next target.


The shooting sequence was done by moving the gun and hands upwards on the second keyframe and down again to its original position on the third. This was repeated a few times to simuklate multiple shots.

To change targets the biped is simply rotated and the shooting process is repeated here with some minor alterations to reduce and visual errors.

The target boards also 'fall-down' after being shot, which was done by simply rotating the the boards 90 degrees downwards so it is hidden behind world objects such as the crates or the floor plan.

Sunday, 28 November 2010

Animating Paintball part2.

Animating the biped can either be a tedious or fairly easy task, depending on what type of animation you are aiming to achieve. In this scene I will be animating my character to run from a kneeling down position towards / past the camera view.


First the character is postitioned kneeling down - this is done by moving the joints into position and lowering the overall height of the character. To stop the character falling through the floor, I added a planted key to the feet and selected the floor plane as the base. By doing this the biped will not pass through the floor and will instead bend his legs.


Using the built-in run sequence under the motion panel was not able to produce the run sequence I desired so I had to manually animate the biped, one position at a time to create a suitable run from kneeling animation. unfortunetly this took a good amount of time regardless of the end result.

Friday, 26 November 2010

Animating Paintball part1.

To animate my paintball player, this will require the use of a biped which will be used to move the character during the scene, performing different actions.


To begin, a biped is added to the scene and positioned according to the character model using the front viewport. in order to manipulate the shape and scale of the skeleton, the biped must be set in 'figure-mode' which allows you to scale and reshape each bone to suit the model.


the trickiest part of the task was the fact that alterations has to constantly be made to the skeleton in order to get the right scale / size when each limb was positioned which proved to be quite annoying at times but fortunetly didn't cause any major problems.


Once the bone rigging was complete - I can now begin to 'skin' the character, which attaches the bone to the model so when we move the bones, the model moves also..


Previously I had some difficulty in skinning and found it takes a lengthy amount of time to get the desired effect, especially when you define the manipulation strength of each bone manually. So I decided to try a new technique using the Physique modifier in 3ds max.

This method begins by adding a node to the existing model to create the link between bone and skin - if successful, a series of 'veins' can be seen running down the limbs and throughout the bone structure.

These veins are basically selection points which allows you to focus on each individual bone to manipulate - I found this to be a much more effective way to focus on what effect bone movement has on its surrounding areas.


The process is fairly straightforward, playing around with the strength and range settings allow you to quickly see which areas are 'pulled' out of position or are being affected too much by joint movement.


Wednesday, 24 November 2010

Animating Festival Leisure Park

I wanted to begin this scene with a 'fly-in' view of festival leisure park - which will be done using a camera attached to follow a path constraint..


I first created a suitable path using the line tool, adding vertices where necessary create a smooth curve. Following this I added a free-camera to the scene. To make the camera follow the defined path, this can be done by adding a 'path constraint' to the position setting under the motion panel.

I then altered the timing settings of the keyframes to ensure a suitable speed was applied to the camera when following the path. Here I have used 300 frames with an fps setting of around 10-15.


HOT TIP - It's extremely important at this stage to test your animation over and over again to ensure you have made the desired effect.


The camera will follow the path into and through the entrance to hollywood bowl where the bowling would roll up the alley to score a strike.

In order to animate the ball rolling, I created several keyframes from frames 201-300 which displayed the ball at different locations up the alley. I also rotated the ball 100 degrees at each keyframe to simulate a rolling movement.


At this point I wanted the ball to hit the pins and hopefully score a strike, which would require the use of the Reactor feature in 3ds max.


By using a tutorial I defined the collision objects and walls which would be affected by this event. Unfortunetly when testing the animation the ball simply passed through the pins instead of knocking them over!

Sunday, 21 November 2010

Modelling Festival Leisure Park part5.

After completing the bowling alley model, I then went to import this into my festival leisure park scene using file > import > merge.


This was connected to the back of the hollywood bowl building which can be seen in this screenshot by simply bridging the edges using the snap toggle option.

Saturday, 20 November 2010

Modelling Festival Leisure Park part4. - Bowling Alley Continued

To keep with the theme, single block colours were used for the walls and dividing sections. I did however find a suitably detailed wooden floor texture for the lane to add more detail.


The next area I focused on was created a section where the bowling ball would move from, the area where bowlers would start their bowling shot from..


I also added ball-retrieval machine between the lanes to continue with the level of detail I aimed to produce. Due to the way I have modelling the bowling lanes this was an extremely easy task to complete, dividing the polygons to form bases and extruding the shape upwards, making alterations along the way to create a neat end result..


To finish the bowling scene I needed to craft a suitable bowling bowl which will later be animated to roll down the alley.


This was done by drawing a sphere and a cylinder. The cylinder was used to cut the whole in the bowling ball where fingers would usually be placed.

HOT TIP - to use an object to cut a section out from another shape, use the boolean modifier and select which shapes you wish to use.


Finally the bowling alley will need pins which will sit at the far end of the lanes.


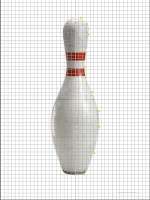
A suitable reference image was found to model from to begin with. I then used the line tool to draw a simple outline along the right side of the shape. To add better curvature to the model I added additonal vertices where necessary.


The best way to create a symetrical 3d object like this with smooth edges all round, is to use a 'Lathe' modifier. This renders your line coordinates 360 degrees, creating a 3d shape. At first the result is no-where near what we need so it's just a case of playing with the X, Y and Z axis to produce the desired shape.

Friday, 19 November 2010

Modelling Festival Leisure Park part3. - Bowling Alley

The next step to create festival leisure park, was the production of a bowling alley which would be placed behind the hollywood bowl entrance.


I started off using a plane as the base of alley section which will house the pins, then after converting this to an editable poly, extruded the edges upwards to form the enclosure.


Next the bevel tool is used to create the inner section with a slight angle towards the inside - for tasks such as this, I've found the bevel tool is absolutely ideal!


Following this, I extended the lane outwards and divided the polygon at the sides in order to create the area at the sides of the lanes where the bowling balls can fall into.


Modelling one lane first allowed me to duplicate it to make symetrical bowling alley featuring five lanes, neatly modelled which looks very simple yet effective. The dips were created again using the bevel tool and extruding downwards slightly.

Tuesday, 16 November 2010

Modelling Festival Leisure Park part2.

Working from the base I created previously, I can select all the surfaces (polygons) and extrude them to create the buildings with the extrude tool. This is an extremely effective and quick method of producing realistic building structures from a flat plane.

Following this I can begin to see how the scene will look like and decide where detail should be added, such as entrances and signs etc.


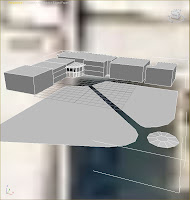
These entrances and windows where created by dividing the surfaces of polygons using the connect tool and the inset tool to create the edges of the windows and doors. I feel this is a nice effect to detail and can be seen from a good distance away. The glass was made using a simple material color such as 'gray' and altering the transparency to a low setting to make it see-through.

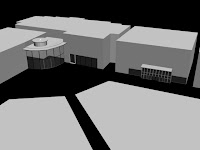

Currently the scene has no major textures or colors applied - this is simply to keep the design easy to see and alter during modelling.


To add character to the scene and stick with the agreed theme being 'cartoony' I used simple block color as material for the buildings. The signs were created using the text tool in 3ds max which is extremely easy to use and model with compared to plane modelling. An example of this can be seen for the 'h' sign for hollywood bowl!


I wanted to add parking spaces for the car park, but wasn't quite sure where to begin with this. Firstly I tried dividing the sections where the car parks were located into polygons as the image shows and using the inset tool to add borders...

Unfortunetly this was not an accurate method of making a simple car park and seemed like a very 'long-winded' approach considering the time taken to do some parts. This was therefore scrapped and a different method considered.

Previously I created a realistic looking leaf by using photoshop to make two flat images - one showing the actual car park texture, the other a bump map (black and white).

The idea here was to add the original texture image as a material, then use a black and white bump map with the desired shape of the car park to remove the sections of the image surrounding it..


the result proved to be a success and took much less time and effort to complete but does however produce a texture map suitable for my needs.

Following this, I also added some pavement around the buildings and edges of the car parks, along with some trees from the built-in foilage section of 3ds max.

Monday, 15 November 2010

Modelling festival Leisure park part1.

Festival leisure park is my second choice of location to render and animate. To begin the same procedure is followed starting with the acquisition of a suitable reference image, in this case a bird's eye view would be perfect..


The image was applied as a material onto a plane, then traced using the line tool to create a floorplan which can be used as a base to model from.


Friday, 12 November 2010

Modelling a Paintball Player part6.

Now comes the tricky part - attaching the gun to the player by positioning it in his hand in a realistic fashion.


The main issue here is 'Scale', which is extremely important when attempting to produce an effective looking gun which suits the character model well. This wasn't a first time lucky event and consistent alterations needed to be made during the process of wrapping the fingers round the handle.


Regardless of how tricky this task was to complete I am extremely pleased with the end result - the way i have designed the model has certainly played a significant role in the ability to allow the character to hold the gun correctly..


At this stage - my models are complete and I can now begin modelling the environment around my scene. I thought about what objects are usually found in a paintball field, such as boxes, tyres, earth-mounds etc. I decided that crates (boxes) would be an effective approach to modelling an environment..


The crate was made by drawing a cobe and converting it to an editable poly..


Each face was then selected individually and the inset tool used to cut the inner section back leaving a border-frame style behind.


I continued to create the environment, drawing a large plane tile for the ground and additional planes which could be later used for background detail.

HOT TIP - Freezing any object you dont need to use while doing tasks like this prevents you from accidently selecting them and making a mistake!